Tuesday, September 25, 2012

Deploying AX 2012 Code : Spotlight


Hi There!
 
I hope everyone is having a good week. In this post I would like to do a spotlight of Dynamics AX Musings on deploying out code in AX 2012.
 
Joris brings to our attention the importance of focusing on models instead of XPO's when we want to move code to different instances of AX. In addition, he does a good job explaining the issues that we will experience when using XPO to migrate code instead of using models, and in what form code should really be handled in AX 201 when it comes to deployment.
 
Joris also points out ways to avoid downtime in a production environment by giving examples from his own experience and by doing an analysis of the white paper Deploying Customizations Across Microsoft Dynamics AX 2012 Environments.

From the post:

"I made this statement to one of our clients a few months ago, and I'd like to share it with you: moving XPOs is barbaric. Yes, barbaric. As AX developers, administrators, implementers and customers we need to move on.

Yes, moving XPOs has some benefits, but they are all benefits to circumvent proper procedure. The benefit of moving one piece of code? That's introducing risk and circumventing proper code release management (branching and merging for the version control aficionados).

The benefit of no downtime? That is bad practice, what about users that have cached versions of your code running in their sessions? Not to mention data dictionary changes. The benefit of not having to recompile the whole code base? Talk about bad practice again, and all the possible issues that come out of that. Sure, you say, but I am smart and I know what I can move without risk"
 
You can access this post from here.

That's all for now folks!


Wednesday, September 19, 2012

Microsoft Dynamics Events - Microsoft Dynanmics World


Hi there!

I got an email from Microsoft Dynamics World with a bunch of very interesting web casts. 

Topics vary from AP automation and Inventory management to Business Intelligence and CRM.

You can access this from here.

 That's all for now folks.


Friday, September 14, 2012

Delete User Layer with AX 2012 Management Shell


Hi there,

I hope you are ready for a great weekend. I will have to work, but this is why we love what we do, and believe that our customers should get the best of us.

Anyway, this is going to be a short post about how to delete a user layer from the model store in AX 2012. I have to say that I miss the flexibility of AX 2009 when it comes to application files and layers. The good news is that for the Microsoft Dynamics AX R2 release, we are supposed to have the code in a different database.

Ok, so going back to our topic, to delete a user layer from the model you first need to install the Management Tools from your AX 2012 setup. Once this is done, you can access the Microsoft Dynamics AX Management Shell and write the following script:

axutil delete /layer:Usr

See the picture below for more details:


As you can see, deleting a layer is not difficult at all and it happens fairly quick too. Also, it is very important that you have a backup of the database before performing this action.

That's all for now folks.


Tuesday, September 11, 2012

Unable to construct an object from the class in the batch framework -


Hi There!

I hope your week is going ok and with lots of challenges.

As we all know, when we want to run a custom class in the server as a batch job we need to extend the RunBaseBatch class and schedule a job for it.

Today I was working on a class that needed to be run in the server in AX 2012. However, before I scheduled the process, I made the choice to test my class from the client to make sure I did not have any bugs. When the test was successful, I scheduled the job and waited for the batch job status to go from Waiting to Ended, and to my surprise I got an error.

I wasn't sure if I did have another bug in my class that I did not catch, so I just copied the sample batch class Microsoft has here and schedule another job to see if the problem indeed in my code. I got the same error:

"Unable to construct an object from the class Sample Class in the batch framework. Make sure that the X++ code has been compiled to Microsoft .NET Framework CIL, and that the constructor does not require any parameters"

Looking at some documentation, I read that in some cases we need to generate a full CIL compile, but this takes forever. Then a good friend of mine mentioned that a an Incremental CIL will most likely fix the error, an it did.

So, just to be thorough I would like to show the steps on how to do this:

Open a new development environment and click Build and then choose Generate Incremental CIL.


It is going to take about 2-3 minutes (it depends from environment to environment).


Then, to double check if the job run well, go to System Administration > Inquiries > Batch Jobs and look for your job. It status should now be Ended.


That's all for now folks. Until the next time.


Monday, September 10, 2012

Creating a Retail Store in AX 2012 Retail


Hi there,

I hope everyone is ready for a new AX filled week, and that you had a good weekend. This week I have a lot of work ahead of me, but I wanted to take the time and share with you the steps necessary to create a retail store in AX 2012 Retail.

The creation of a retail store requires many steps and some planning. I would like to extend my gratitude to Liam Breslin for his knowledge on this topic. He is a Senior Consultant for Junction Solutions and he specializes in Retail. You can contact him on his LinkedIn profile for any questions you might have about AX 2012 Retail.


So, let’s go to the good stuff now and let’s create retail store in Microsoft Dynamics AX 2012

1- Go to Retail > Common > Organization

2- Click the Organization Hierarchy tab button to create a new organization hierarchy.


3- When the new window opens, click New and assign a name to the new organization hierarchy (i.e. Retail Store).


4- Then click the Assign Purpose button to open the Organization hierarchy purposes window. In here we need to link the Organization Hierarchy you just created in step 3 with the organizational chart portion of AX.  To accomplish this, click the Add button to add a new Assigned Category. Once you have created the assigned category, click the Set as Default button. This will set your configuration as the default one to carry on later on the process.


5- When step 4 has been completed, click the Retail Assortment menu on the left and follow the same process you executed in step 4.


6- When finished you should see the following


7- Then go to Organization Hierarchy and click the Organization Hierarchy view. When the Hierarchy Designer opens, click the Edit button.


8- Click the Insert button and choose Legal Entity


9- The legal Entity (i.e. CEU) will appear in the Retail Store designer.


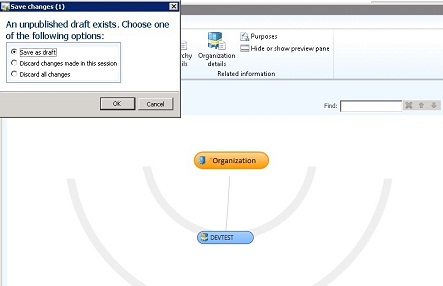
10- Click as Save as Draft. On the Save Changes windows choose “Save as draft” and click OK.


11- Then you to Retail > Common > Retail Channels > Retail Stores


12- Click New Retail Store and fill the required fields.


13- Go to the miscellaneous fast tab and make sure you have your payment methods. On this, for some reason in my environment, the Credit Card Payment method needed to be setup to 2 and not 02.


14- If all goes OK, you should see the following.


15- Now, go back to Hierarchies to add your new Retail Store to it under your organization. For this, click the Edit button and choose “Keep working on this draft” and click OK.


16- Click the Insert button and choose Retail Channel.


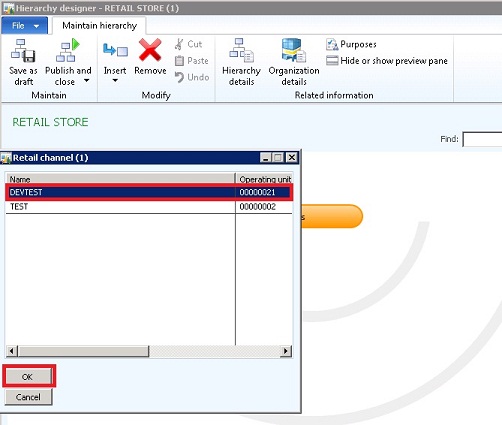
17- From the Retail Channel window choose your new retail store, and click OK.


18- If all is ok, you should see something similar to the picture below.


19- Save your new model as draft again.


20- In order to make the model “official” within AX, we need to publish it. Do this by clicking Publish and Close the Viewer.


21- Select the effective date when you want this model to be active and click the Publish button.


22- You should see the following message.


Once you have created your retail store(s), then you can create assortments and assign them to products and/or product groups to be publish into the retail channels. The assortment(s) will then be transferred to the AXRetailPOS database through an N-JOB.

I will cover this portion in one of my next post.

Until then!


Thursday, September 6, 2012

Zip Codes Upload in AX 2012


Hi there,

Today I would like to discuss how to load Zip Codes to AX 2012 from a Text file and also point out what happens in the background.


In AX 2012, this task is fairly simple as there is an abstract class (AdressZipCodeImport) that takes care of this function. In addition to the abstract class, there is another class (AdressZipCodeImport_US) for each specific country that overwrites the ReadFile() method in the AddressZipCodeImport abstract class. In AX 2012, there only 4 countries available for Zip Code upload.

AddressZipCodeImport Class:


AddressZipCodeImport_US Class:


The AdressZipCodeImport_US class ReadFile() method contains a while loop that will allocate the data from the file being read  into the LogisticsAddress variables. To accomplish this, you will have to have your zip code, city, state and county name in an Excel file where you create the required spaces between fields and then save it as space delimiter file.

ReadFile() Method:


The following is an example of this sequence:


The following is the ReadFile() sub string coordinates:


When your file is ready, you can upload it by going to Organization Administration > Setup > Addresses > Import Zip/Postal codes:


Once you run this, the data will be in the LogisticsAddressZipCode table


It is very interesting to see how the AX 2012 team has put a lot of thought into these common tasks as they help us be more efficient on something we don't need to really spend a lot of time figuring out.

Until the next time!


Wednesday, September 5, 2012

Spotlight - Formula 1 Team Races With Microsoft Dynamics


Hi there,

I hope you are having a great week and that you are ready to hear great news about Microsoft and its effort to introduce Microsoft Dynamics to every business.


From the article:

"This spring, the Lotus F1 Team and Microsoft announced a three-year partnership that stamped the Microsoft Dynamics name on the team's cars and its drivers' overalls.

But the deal goes well beyond logos. The Lotus F1 Team is using Microsoft Dynamics AX to help fine-tune and drive every aspect of its business, from managing the design, manufacturing and testing of the 20,000-plus parts on each car to analyzing real-time data from the racetrack"

I'm super excited about the news as it reinforces my belief that we have a platform that just works in every industry, in every business, every time. No wonder why the AX 2012 logo "Powerfully Simple" says it all.

You can read the article here.

Until the next time!


Thursday, August 30, 2012

Spotlight: Adding PowerView Dashboards To Dynamics AX 2012

Hi,

I hope everybody is doing great today and that you are ready to enjoy this long weekend.

Today I wanted to take the time and give a spotlight to one of my co-workers, Murray Fife. Murray Fife is a Senior Solutions Architect for Junction Solutions. He has contributed a lot to the community over the years and he is always paving the road on new topics regarding AX in general.

On this post, I would like to share a recent post he created on adding PowerView dashboards to AX 2012.


From the post "One of the built in features is the ability to create your own data from the base query that you run, and that data may be images rather than the traditional data types"

You can access his post from here.

I encourage you to read this post and follow Murray Fife to get his latest updates on AX 2012.

This is all for now folks.

Until next time.

Friday, August 17, 2012

Working with the AX 2012 EDT relation migration tool


Hi there!

This week I was faced with a couple of problems related to the relationships between tables made under an Extended Data Type (EDT). In my case, I learned that when relationships between tables exist through EDTs, they only capture a single field relationship and not necessarily a “real” relationship between tables.

A good example of this is when we assign an ItemId EDT to a custom field in a custom table. In this case, AX 2012 will ask you to create an EDT relationship, so I did. Later on the week, I was getting an error related to a violation of a primary key in the custom table I created when data was being inserted to it.

The error was related to the relationships being defined under an EDT as the kernel was have issues defining which relationship to examine first.

It took me a while to understand that the problem was the EDT relationship and after looking at some documentation it was easy to catch the issue as EDT relationships do not contain relationship metadata, such as cardinality and relationship type, and more often than not, they cannot be included in the relations node.

Luckily for us, AX 2012 provides a simple way to fix the EDT relations issues fairly easy. In fact, the migration can be done both manually or using the new EDT relation migration tool. However, if the data model is not correct, there are cases where we are going to have to fix the EDT’s manually.

To begin using the EDT relation migration tool, open the form for the tool by using the navigation path Tools > Code upgrade > EDT relation migration tool as seen in the picture below.


NOTE: Just keep in mind that if you are using this tool for the first time, AX 2012 will ask you if you want to refresh all the EDT relationships data, click yes and the EDT Migration tool will open.


When the form has opened, follow the next steps:
  1. Select a table from the Table name pane.
  2. Select each relation in the EDT relations table and choose an action from the Migration action drop-down menu for each of them.
  3. After you have set an action on all the relations for that table, click the Migrate single table button on the ribbon at the top of the form.

See Image for clarification:


What happens in the background?

  1. The migration tool attempts to find a match for the EDT relation in the existing relations in the selected table. If a match is found, the SourceEDT property on the table relation is set to the name of the EDT.
  2. However, if there is no match found in the table, the EDT migration tool will create a new table relationship only if the index (IndexType ) on the referenced table (shown by “”) is set to the correct table relationship.
  3. Finally, the tool will not create a new table relation if the matching index for the EDT field on the referenced table is set to NoIndex, Unique, NonUnique.

Example: Migrating an EDT relation to a new table relation.

This example shows the case in which an EDT relation is migrated to a table where the table relation was previously not defined. The result from this example will be the creation of a new table relation.

The EDT PKTableField1 defines a relation to the PKTable.Field1 field, which is an alternate key AK1.


In addition, before the EDT migration, the FKTable.Field1 field uses the EDT PKTableField1, which makes it a foreign key into PKTable. However, there is no table relation defined on the FKTable, and the ExtendedDataType property on FKTable.Field1 is set to PKTableField1 instead.


We choose the FKTablle and under the Migration Action, we choose Migrate.


What happens in the background?

The EDT relation migration tool performs the following actions:
  • The EDT migration tool creates the new relation to the PKTable under the Relations node of the FKTable. This relation will be of type Normal because the key is not the primary key.
  • Then, the EDT migration tool will set the EDTRelation property of the PKTable relation to Yes. This is because the tool performs the direct migration of an EDT relation to the table relation.
  • Then, the EDT migration tool creates one field link, FKTable.Field1 == PKTable.Field1, for the PKTable relation.
  • Finally, the EDT migration tool will set the SourceEDT property of the field link to PKTableField1.

What to expect the next time we use the tables?
  • All the APIs that used the EDT relation first on FKTable.Field1 will now find the same relation with the same field link under the PKTable relation by examining its SourceEDT property.
  • If a table relation that refers to PKTable already exists in FKTable, all the APIs that used those table relations will not pick up the PKTable relation because it is flagged as an EDTRelation, and the PKTable relation to the Relations node of the FKTable, with its EDTRelation property set to Yes.


In addition to the above, we can also double check the outcome of the EDT migration tool by looking at the SourceEDT property of FKTable.Field1. This should have been set to PKTableField1 to maintain a relationship with the EDT.


Let recap for a minute on what we just went over. The EDT relation migration tool can be used to automate the following actions:

  • Copy an EDT relation to all hosting tables.
  • Automatically set the EDT migration properties (markers) to reflect migration status.
  • Automatically populate relation metadata.
  • Derive cardinality from the index on the foreign key.
  • Derive the relationship type from the delete action/key composition.
  • Determine role names.
  • Report AOT objects impacted by the migration, depending on the relation used. The objects that can be affected include:
    • Queries:
    • Forms
    • Delete actions on tables
    • Data sets
    • X++ reports
Well folks, I think this is it for now. I really hope you like this article and that can help you at some point in your AX 2012 adventure. Also, I will be writing a bit more about AX 2012 Retail and Inventory and Product management in AX 2012 soon, so don’t miss it!


Have a great and restful weekend!