Hi there,
I hope you are ready for a long and restful weekend. Certainly, I'm as this has been a tough week with lots of new challenges and lots of new learning, which is great.
On this post I would like to point out a very interesting post about using delegates in Microsoft Dynamics AX 2012. The post was written by Marcos Calderon, who works for Microsoft as their SDE Lead.
In his post he starts by showing us how to create a delegate in Microsoft Dynamics AX 2012, then he explains what delegates are and why they are used. He also explains what Event Handlers are and their relationship to the AX 2012 AOT.
Finally, he give us an example on how to add an event handler programmatically in X++, and how to publish the subscriber into the same tier for later use.
From the post:
"...X++ delegates expose the publisher -subscriber pattern where a delegate defines a clear contract in a publisher class. This contract is used when an event occurs where the event can be a change of state, where all interested classes receive notification that the event has occurred."
You can access his post from here.
Well folks, that's all for now and until the next post!
Hi There!
I hope everybody is having a great week and that you are ready for the weekend. Well, things in New York are not that good. First we had Sandy and just yesterday (Wednesday) we had a Nor-Easter as well! I'm pretty sure the rest of the country has suffered from natural disasters, but I think New York wasn't prepared for something this big.
Anyway, life goes on and AX2012 does too. So, I wanted to share a great post about adding financial dimensions to AX 2012. The post goes in detail on this topic allowing us to deeply understand the relationship between financial dimensions and everything else in AX 2012, and it shows us a step-by-step sequence on creating new financial dimensions in AX 2012.
You can access the post here.
Have a great weekend!
Hi there,
I hope everyone is ready for a new AX filled week, and that you had a good weekend. This week I have a lot of work ahead of me, but I wanted to take the time and share with you the steps necessary to create a retail store in AX 2012 Retail.
The creation of a retail store requires many steps and some planning. I would like to extend my gratitude to Liam Breslin for his knowledge on this topic. He is a Senior Consultant for Junction Solutions and he specializes in Retail. You can contact him on his LinkedIn profile for any questions you might have about AX 2012 Retail.
So, let’s go to the good stuff now and let’s create retail store in Microsoft Dynamics AX 2012
1- Go to Retail > Common > Organization
2- Click the Organization Hierarchy tab button to create a new organization hierarchy.
3- When the new window opens, click New and assign a name to the new organization hierarchy (i.e. Retail Store).
4- Then click the Assign Purpose button to open the Organization hierarchy purposes window. In here we need to link the Organization Hierarchy you just created in step 3 with the organizational chart portion of AX. To accomplish this, click the Add button to add a new Assigned Category. Once you have created the assigned category, click the Set as Default button. This will set your configuration as the default one to carry on later on the process.
5- When step 4 has been completed, click the Retail Assortment menu on the left and follow the same process you executed in step 4.
6- When finished you should see the following
7- Then go to Organization Hierarchy and click the Organization Hierarchy view. When the Hierarchy Designer opens, click the Edit button.
8- Click the Insert button and choose Legal Entity
9- The legal Entity (i.e. CEU) will appear in the Retail Store designer.
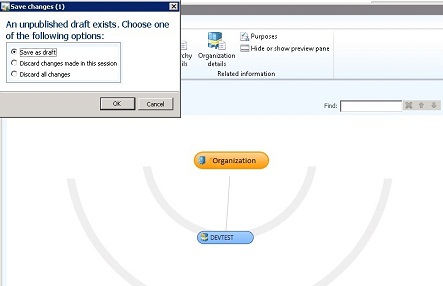
10- Click as Save as Draft. On the Save Changes windows choose “Save as draft” and click OK.
11- Then you to Retail > Common > Retail Channels > Retail Stores
12- Click New Retail Store and fill the required fields.
13- Go to the miscellaneous fast tab and make sure you have your payment methods. On this, for some reason in my environment, the Credit Card Payment method needed to be setup to 2 and not 02.
14- If all goes OK, you should see the following.
15- Now, go back to Hierarchies to add your new Retail Store to it under your organization. For this, click the Edit button and choose “Keep working on this draft” and click OK.
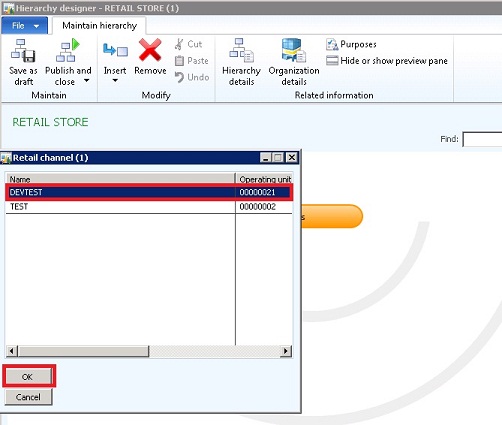
16- Click the Insert button and choose Retail Channel.
17- From the Retail Channel window choose your new retail store, and click OK.
18- If all is ok, you should see something similar to the picture below.
19- Save your new model as draft again.
20- In order to make the model “official” within AX, we need to publish it. Do this by clicking Publish and Close the Viewer.
21- Select the effective date when you want this model to be active and click the Publish button.
22- You should see the following message.
Once you have created your retail store(s), then you can create assortments and assign them to products and/or product groups to be publish into the retail channels. The assortment(s) will then be transferred to the AXRetailPOS database through an N-JOB.
I will cover this portion in one of my next post.
Until then!