Showing posts with label Server Configuration. Show all posts

Thursday, November 10, 2011

Debug X++ code in a Batch Server in AX 2009

Hi there!

Today I would like to discuss how to debug X++ code in a batch server. One of the common scenarios in AX development is the debugging of X++ code in the client.

For example, if you want to debug the SalesFormLetter class after posting either a Packing Slip or an Invoice, you just would go to the AOT > Classes>SalesFormLetter look for the method you want to debug and add a breakpoint. Simple!

In AX 2009, however, we have the ability to run Batch jobs directly on the server (unlike prior versions (i.e. 3.5)). The problem is that to accomplish this, we have to configure a few things.

The following are the steps to accomplish debugging X++ code in a batch server. The example is going to be using the SalesFormLetter class run method.

NOTE: Please use a Development or Test environment to try these steps.

1- Open the Client Configuration Utility and Click the Manage button. Choose Create New Configuration.

2- Give it a name. (I have chose Debug2713)


3- Set the server name, instance name and port (the default for the first instance of AX will be 2712. If you have more than one instance make sure you have the right port. In my case the AX second instance is 2713)


4- Go to the developer tab and check the both "Enable user breakpoints to debug in the business connector" and "Enable global breakpoints to debug code running in the business connector or client" check boxes.


5- Now open the Server Configuration File and Click the Manage button. Choose Create New Configuration. Give it a name (i.e. Debug)

6- Set the application file location and the alternate bin directory and the Application instance. In addition, check both the "Enable breakpoints to debug X++ code running on this server" and "Enable global breakpoints to debug X++ code running in batch jobs" check boxes.


7- Click the Database Connection tab and set both the server name and database name.


8- Open the AR module and go to Periodic > Clean Up > Sales update history clean up

9- Choose the Executed Clean Up option and a date and click OK.


10- Open the AOT, go to Classes and look for the SalesFormLetter class. Open the class and look for the Run method and place a breakpoint anywhere in the code.


12- Open the AX 2009 debugger


12 - Go to AR > Common Forms and open the Sales Order Details form. Choose an Open Order and click the Post button. Choose Packing Slip (i.e.)

13 - The SalesEditForm will open. Click the Batch button and set the batch.
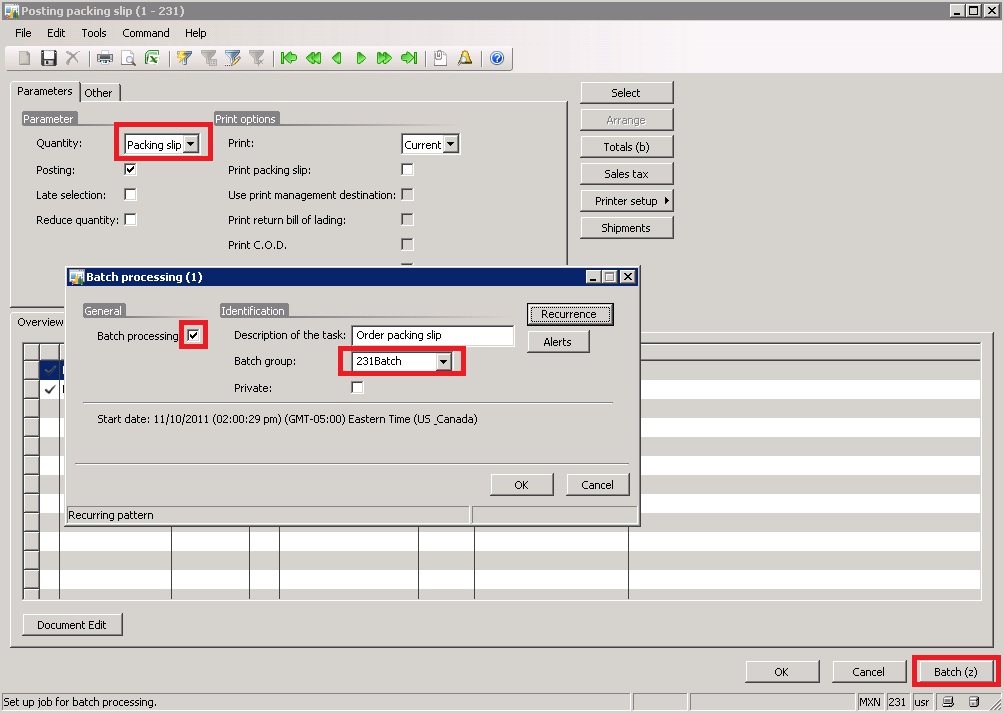


14- After clicking the OK button you should see the following message


If you want to check the status of your batch you can go to Basic > Inquiries >Batch Job. Your scheduled job should be in there. Wait a few minutes and the debugger should open at the breakpoint you inserted before.


NOTE: Sometimes you will have to restart the AOS service when the debugger does not open and your job has already executed. In addition, you MUST have a batch group setup.

Take Care!

Monday, October 31, 2011

Plan a Succesful AX 2009 System Topology

Hi,

Today I would like to talk about a topic that, when followed with professionalism, can differentiate a good consultant from a bad one.

If you think about it, Microsoft Dynamics AX has become the way to help companies become more efficient, and to also help them save money. However, is also true that AX (in general) has become a big boom where some (low quality) partners and developers are not following up certain guidelines to make an implementation a successful one.

The result ... Customer dissatisfaction and a bad taste for AX.

In this article I would like to discuss the basics to plan a good system topology. In other words, what do we need to have in mind when faced with this task. What kind of question should we be asking the customer.

For example,  A large business with multiple locations might experience different challenges compared to a smaller business with one location and only a few users.

So, a good tip would be to start the implementation process by (1) creating an inventory of the customer's current hardware and software, and (2) determining the deployment scenario that best meets the business’ current needs and future growth.

 So, before the actual installation occurs, we must collect information about the customer's requirements to help prepare the correct topology.

1- Define and document these items with the customer:
  • Number of transactions
  • Number of users
  • Uses of system (modules and features to be implemented)
  • External user access required
  • Web access required
  • Required availability
  • Projected growth rate
  • Number of sites

2- Evaluate and document the existing infrastructure:
  • Existing hardware
  • Bandwidth
  • Operating system
  • Databases present
  • Applications to integrate

3- After collecting this information, determine how to structure the system. Key decisions are as follows:
  • If there are any computer roles that can be combined on a single computer? If computer roles can be combined, consider which ones to combine.
  • Determine whether there are any network load-balanced clusters to host the AOS.
  • Select a backup system for the Microsoft Dynamics AX environment.

Topologies

If the customer's requirements are focused on not allowing users outside the domain, then use the following topologies:


Minimal Base Topology


Clustered Base Topology (You can install the application file server on a AOS server as you will have more than one AOS server)


Enterprise Portal Topology

There are two (1) Intranet (Simple and Large-Scale), and (2) Internet-Facing

Intranet


Intranet Large-Scale


Internet-Facing Enterprise Portal


Standard Perimeter Network
With a standard perimeter network the Active Directory domain contains:
  • All internal users to be added to Microsoft Dynamics AX 2009.
  • Special users required for Microsoft Dynamics AX functionality.
  • An organizational unit that contains any users from outside the organization that require Enterprise Portal access. These users’ rights must be restricted in that the users cannot:
                      Log on locally
                      Access network


Traditional Perimeter Network
Basically, the traditional perimeter network contains two Active Directory domains: the internal domain and the external domain. The internal domain contains:
  • All internal users to be added to Microsoft Dynamics AX 2009.
  • Special users required for Microsoft Dynamics AX functionality.
  • Group required for application integration server functionality.
[From Microsoft Training Material]
The perimeter network contains a second domain controller with a one-way trust relationship to the first domain controller. The second domain controller contains any users from outside the organization that require Enterprise Portal access.
These users cannot have any rights in the internal domain, and their rights must be restricted in the perimeter network domain so that the users cannot:
  • Log on locally
  • Access network

 Report Server Topology (This is installed on IIS and is not Internet-Facing)


Application Integration Server Topology (This is also installed in IIS and is not Internet-Facing)


Let's be consistent in the work that we do. Let's provide a great customer satisfaction so Microsoft Dynamics AX can keep growing and helping businesses succeed. By following the above suggestions, we can make a huge difference in how new businesses experience AX implementations.

Take care!

Tuesday, August 23, 2011

AX 2012 - New Improvements in Data Security

The new version of AX offers many new features to all of us. These go from development improvements to data security, which is the one topic I would like to focus on in this post.

The following are the improvements with regard to data security:
  • Role-based security
  • Server-enforced security
  • Extensible data security framework
  • Flexible authentication

Role-based security
Data security is much easier to manage. In AX 2012, users are assigned to roles based on the duties and responsibilities they have and access is granted based on those roles. This change puts an end to the tedious and time-consuming process of assigning users based on application objects. Once set up, role assignments can easily be updated based on the business data.


Server-enforced security
Authorization is performed on the server rather the client, consistently enforcing permissions on protected fields regardless of the type of client. The server sends the client only the information that the user has been granted access to, resulting in increased data security.


AX 2009 did not offer the facility to use data security based on effective date. However, in AX 2012 administrators can specify whether users have access to past, present, or future records with different levels of access, which creates much for flexibility to all the different iteration in the use of data throughout the life of the application.

Further, the new version can also be used to create data security policies based on data contained in a different table.

For example, in previous versions you could not filter sales lines by customer location because those were stored in different tables, but the new version makes that totally possible.

Data security policies are enforced at the server regardless of the type of client used to access the data.

Flexible authentication
Authentication of users by methods other than Active Directory allowing external users to access Dynamics AX without a required domain account.

Tuesday, June 7, 2011

Managing Multiple AOS Instances - AX 2009

When multiple instances are installed, use the Microsoft Dynamics AX Server Configuration utility to manage all AOS instances. Use the Server Configuration utility to verify that the AOS connects to the correct database and application file server.

1. Open the Server Configuration utility (Start > Administrative Tools > Microsoft Dynamics AX Server Configuration).

2. Click Manage, click Create configuration, and then enter a name for the configuration. Then determine whether to copy it from the active or original configuration.

3. On the Application Object Server tab, validate that the Application file location is correct.

4. In the TCP/IP port field, note which port the AOS is running on.This information is needed to connect to the AOS.

5. On the Database tab, validate that the AOS is connected to the correct database. If not, change it.

6. Click OK to exit the configuration utility